SA - 0231 - London Road Mk II TCH137
London Road Mark II
Many members will be familiar with my first London Road layout, which appeared in the December 1998 issue of TCH and was open for viewing at the two Adelaide Conventions. After a life of twelve years, some aspects of the layout were beginning to irritate me. The two main problems were the duck-under and the baseboards. The baseboards were my first attempt and, whilst sturdy enough, a number of undulations were making the running wave-like. Even though my baseboard height was 1200mm, the ducking under was becoming a nuisance, particularly for visiting friends and when hosting BRMA meetings.
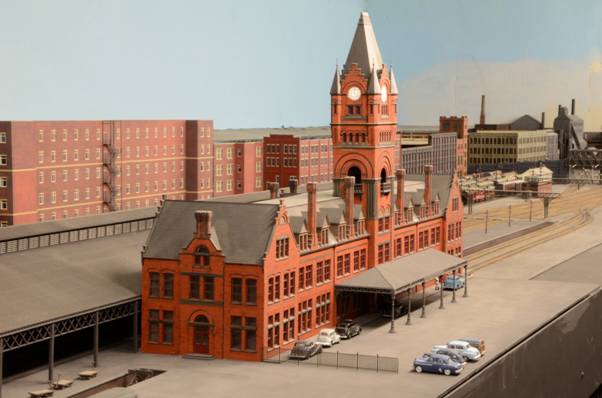
Figure 1 - The station building is a Walthers kit based on Milwaukee Central which I have stretched to produce a better proportioned building. It makes an impressive centrepiece for the layout in the style of Nottingham Victoria.
As I became more disenchanted, I found my enthusiasm waning and new work virtually stopped as I grappled with possible solutions, all of which were going to be drastic. I shared my thoughts with our wiring expert, as he would have the final say on feasibility. As I contemplated raising the whole layout by 30mm, or maybe a complete rebuild, my partner suggested running the layout down the middle of the room, creating a dog-bone shape. This would allow me to retain the storage loops and eliminate the duck-under. It also meant a rebuild of the main part of the layout and a big wiring job. The idea of taking the return curves to the storage loops outside the ends of the room was a tempting option. This would effectively add another 3 metres to the length of the layout, giving 13 metres without any obvious curves. Having access from both sides of the layout meant I could have wider than normal baseboards, allowing for greater viewing depth.
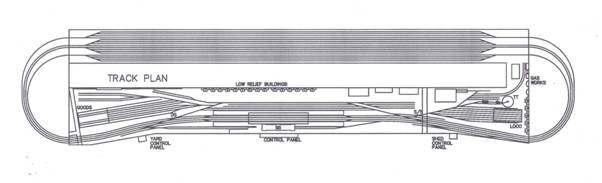
Figure 2 - Trackplan.
So, the dog-bone it had to be. All I needed was the green light for the wiring, hoping that there was one more "magnum opus" left. You can imagine my elation when he said, ‘Yes’!! Then, to make it even better our master carpenter offered to build the baseboards for me, BRILLIANT!!!
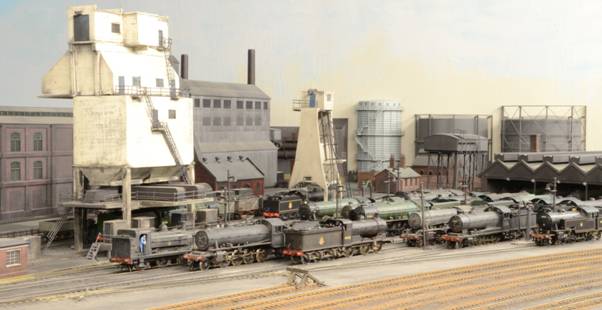
Figure 3 - No room to spare at the shed, it must be Sunday. A varied selection of motive power at rest before starting their duties on Monday.
Now to turn the ideas into reality. On 5th January, 2009, the power was cut off, and demolition commenced. A few points and some of the buildings were salvaged, but the plain track and most of the points were binned, along with the main station's curved overall roof, a project that had taken many hours to build. As the demolition progressed, there were some transient pangs of regret, but I was spurred on by what was to come. It wasn't long before the train room had been cleared, with only the storage loops left standing along the back wall.
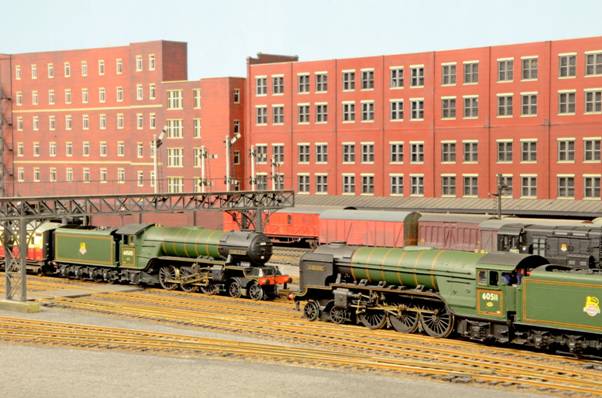
Figure 4 - Thompson pacifics meet at the northern end of London Road. A2/2 60505" Thane of Fife" heads a Kings Cross-Newcastle working as A2/3 60511" Airborne" brings a southbound parcels train through the station. Both of these superb models were built from DJH kits.
The baseboards were soon on the way, using L-girder bracing and a lot of 16mm chipboard, and in no time at all I was gazing at a large expanse of bare baseboard contemplating what lay ahead. I had decided to stay with the four track main lines and most of the other features from the previous layout. The main change was to place the station in the middle of the layout, with the engine shed at the right-hand end and the goods depot at the left-hand end. I had looked at so many layout plans and prototype station plans in the planning stage, picking out features which would fit into the overall plan, so it was now time to lay the trackwork and make it fit the space.
The main lines were the first to be marked out and, in sharp contrast to Mk I, they were to be sweeping curves with as little straight track as possible. Having the station centralised meant that two throats had to be laid. I was not keen on using slips because of the very tight radius, but I was convinced that, apart from the space they saved, "real" station throats were a sea of slips and diamond crossings, so two single slips and a double slip were incorporated. Whilst the space taken up by the station throats is slightly compromised by the sweeping curves. the final appearance is much more pleasing than the dead straight main line of MK I. Using Peco Code 75 track and associated pointwork has its drawbacks, but that is something I can happily live with, as most of us do. Careful laying, ballasting and weathering produces a realistic and reliable permanent way that goes a long way to producing the faultless running qualities we seek.
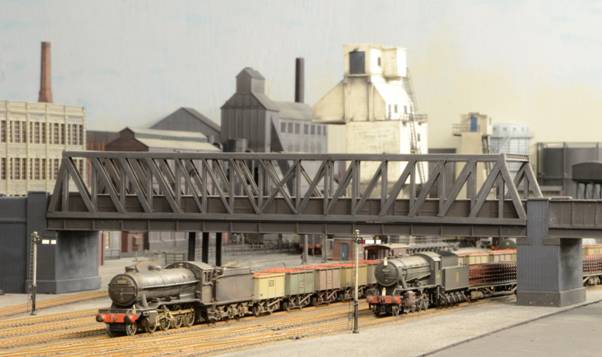
Figure 5 - The girder bridge at the northern end of the station sees O2 63969 heading south with a load of iron ore as WD 90015 waits in the loop with a train of 60ft track panels.
By July 2009 the main lines had been laid and the magic under the baseboards was complete and it was time for the inaugural train to be run. ‘Jubilee’ 45567 ‘South Australia’ was given the honour and off she went, disappearing through the hole in the wall and eventually reappearing through the opposite hole in the wall, after what seemed like an age. Success! Now to lay the rest of the track in the engine shed, goods depot, carriage sidings, etc. Work progressed nicely, so that by January 2010 I was ready to host a BRMA meeting, which was very well attended as everyone was curious to see the new layout. Everything went really well with lots of positive feedback. Now that I was off and running, the enthusiasm was back in a big way and I was determined to make what will be my last layout something to be proud of.

Figure 6 - J50 68984 sorts out some vans in the extensive goods yard in front of the warehouse.
The centrepiece of the layout is the station, which needed an imposing building. My original scratchbuilt effort on Mk I was unsuitable, but the Walthers kit based on Milwaukee Central appeared on the market and I persuaded myself that it would not be out of place. It has a similar look to the Nottingham Victoria and Shrewsbury buildings and comes with an overall roof, which again looked "British" enough. Some careful kit-bashing produced a better-proportioned building, whilst the overall roof was extended to a length of 1.7 metres. With the platforms coming in at 3.5 metres in length, a quite impressive station is the result.
My other major project was to produce a suitably large goods facility. Various kits were considered, but nothing was totally suitable, so scratch building it had to be. After much researching I kept returning to the Great Northern warehouse situated alongside Manchester Central Station. Using my favoured technique of 3mm MDF clad with embossed plastic brickwork, careful cutting of the 102 window apertures to receive the etched brass windows produced a passable model. It measures 800mm x 400mm, about half the scale size of the real building, and sits very nicely in the spacious goods yard.
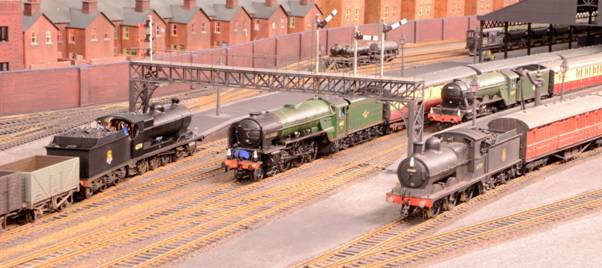
Figure 7 - A busy scene at the south end of the station as A1 60127" Wilson Worsdell" glides through on the up "Heart of Midlothian". A3 60067 "Ladas" waits to follow with a Newcastle-Colchester train which it will work as far as Doncaster. J11 64389 simmers in the bay with a local while O4 63719 heads north with empty mineral wagons.
The engine shed plan is a mirror image of Stafford, slightly modified to fit the space available. The shed building and excellent Fleischmann turntable were retained from Mk I, but the coal stage and ash plant are from Bachmann and they certainly look the part.
I have also been tempted with some of the offerings from Hornby and Bachmann's ready- made buildings, if they fit the bill. With a layout this size, based on an urban setting, there is a lot of space to fill, so the temptation is too hard to resist.
Another innovation I have embraced is the switch to Kadee couplings on the goods stock. So simple now that the NEM pockets are universal - better late than never, I suppose, but just another example of British RTR being so far behind Europe and the US. As the coaching stock is kept in fixed rakes, I have retained the Roco or Hornby's Roco style close couplings. These produce a much closer coupling and realistic look to the train, especially when running.
The scenario of a fictional location set in the 1950's was chosen because I wanted to re-create the pinnacle of British Railways steam. My trainspotting days during the 50's were spent mainly around the London Midland Region (Manchester, where I lived, Crewe, Carlisle, etc.), then over the Pennines to the Eastern and North Eastern Regions (Leeds, York, Newcastle and Doncaster). Summer Saturday visits to Shrewsbury fostered an admiration for the Western Region, as did holidays in Cornwall, whilst a visit to Oxford gave me a glimpse of the Southern. Having collected a large amount of stock over the years, I can run each of the four Regions, changing over to coincide with a BRMA meeting. The layout is operated on a sequence basis at present, with each train making only one appearance. With 36 trains held in the storage loops, there is plenty of variety on offer. Having three separate panels, there is ample scope to keep 4 operators busy, two on the main panel, one on the goods yard panel and one on the engine shed/gas works panel. All I need to do is to draw up a timetable!!!!! Most of the time I operate on my own and I shrink myself down to 4mm scale and I am back trainspotting in those golden days of steam - sheer magic! On BRMA meeting days I get help on the main panel and we usually parade most of the 36 trains around for the visiting members (27 were packed in at my July 2012 meeting).
There is still much work to be done, but progress is steady. I enjoy operating so much that sometimes the modelling side takes a back seat, but that is the way I do things and there is no rush to the finish line. This is my final layout, so I shall take my time and enjoy every minute of its development. Each time I enter the train room (which is every day) I take a moment to gaze at my little piece of British Railways in miniature and reflect on how fortunate I am to be a member of BRMA. I know that I would never have had a layout of this quality and scale without the support and friendship of the group. In particular I need to thank those other BRMA Members who made the whole rebuild happen by offering to do the wiring and baseboards. The wiring is an absolute marvel, on top of which meticulous drawings of the electronics were provided. It really is impossible to thank him enough. Also a massive thanks for the superb baseboards. Thanks are also due to others for their help.
Now I am off to drive the "Queen of Scots", or should I start another building or maybe some weathering…mmm!