
Photographing model railways with simple cameras
Photographing Model Railways with simple digital cameras
Digital Single Lens Reflex cameras are generally the best for photographing model railways but most of us don’t have one. What we probably have is a compact digital camera and/or a mobile phone or tablet with a camera.
These cameras are designed to be simple to use and provide good pictures of landscapes and family groups under a vast range of conditions. To do this they are fully automatic and make the maximum use of electronics to keep the cost down. As a result most have a fixed aperture because an aperture control is mechanical and mechanical items are costly to make and less reliable than electronic parts. The lenses in phone and tablets are of fixed focal length whereas those in compact cameras are zoom lenses which give greater flexibility in positioning the camera.
Because these cameras don’t have an aperture control they have a large aperture, usually around f/2, to give maximum performance in low light, but this usually gives us problems with having the entire picture in focus when photographing a model railway.
This doesn’t mean we can’t use these common cameras to photograph our layouts; we just have to work within their limitations.
Depth of Field
The aperture of the lens is what determines the amount of light that lands on the sensor. The arithmetic is simple, basically the amount of light through a lens with an aperture set to f/2 is double that through one that is f/2.8 and that is double one that is f/4 and that is double one that is f/5.6 and so on. So the smaller the number with the f, the larger is the aperture of the lens. More light through the lens is usually good, but it has a trade-off because at larger apertures it is likely that not all the picture is in focus. The distance that everything is in focus is called the depth of field. This usually is seen when something in the centre of the picture is in focus but items nearer and farther away are out of focus. The depth of field is shorter the larger the lens aperture, i.e. the smaller the f number.
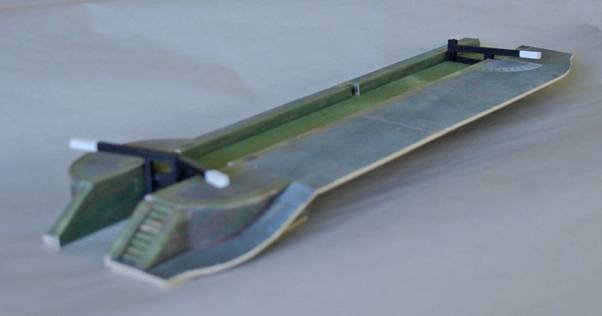
The photos below show the effects of depth of field when the size of the aperture of the lens is changed.
The two
photos below were taken from exactly the same viewpoint; the only difference is
that the top one was taken at f/4 and the bottom one at f/27. Note how the bottom gates of the lock and the
steps on the top photo are out of focus while those on the bottom photo are in
focus.
In both these
photos the lens was focused on the top gates of the lock which of course, is in
focus.
These
pictures were taken with a DSLR in this case a Pentax
K10D with a Sigma 18‑125mm lens.

Minimising the Effects of Depth of Field
If you have a camera in which you can change the size of the aperture then to take good photos of model railways you start by setting the aperture to the smallest possible, i.e. the highest f number, and use a tripod to steady the camera because the shutter speed will be rather long. This may give you enough depth of field to produce a good picture, but it may not and if you only have a simple camera with a fixed aperture lens what can you do?
One way is to take photos with the subject side on so that it is all within the depth of field. This doesn’t result in particularly interesting photos and is a little difficult with a layout, however with care you can choose subjects and angles such that the part you want to get a picture of is in focus, it may not matter if the background is out of focus, in fact this will draw the eye to the part that is in focus, and the foreground can probably be cropped out.
While this will work for some pictures it is rather limiting, is there a better way? Yes there is and to use it we need to understand a little about depth of field and what this means for where we place the camera in relation to what we are photographing. It also uses the fact that modern digital cameras have many more pixels than we need to get printable photographs.
For every lens, sensor and aperture size combination there is a focus distance where as we move the focus point away from the camera the far distance of the depth of field becomes infinity and this distance in known as the hyperfocal distance. With the lens focused at this point the near distance for depth of field is half way from the camera to the focus point. In table 1 I have listed the hyperfocal distances for some cameras and a typical phone and tablet. All DSLRs can be grouped together because it is the lens that determines the hyperfocal distance and it will depend on the lens in use on the camera. The other cameras have permanently attached zoom lenses and the hyperfocal distance depends on the selected focal length. The phone and the tablet actually have fixed focal length lenses, the apparent ability to zoon is achieved by digitally enlarging the picture, many compact cameras can also do this and it is the same as cropping the pictures using Photoshop or similar image processing software. For the phone and tablet I have used typical lens focal lengths and the actual apertures, because I was unable to confirm the lens specifications for any tablet or phone.
|
Table
1 Hyperfocal distances for selection of cameras |
|
|||||
|
Camera |
Focal length setting mm |
Sensor mm |
Sensor area mm2 |
Aperture |
Hyperfocal distance m |
|
|
DSLR |
33 |
23.6 x 15.7 |
370 |
f/8 |
6.89 |
|
|
Olympus EPL1 |
25 |
17.3 x 13.0 |
225 |
f/8 |
5.42 |
|
|
Nikon P340 |
11 |
7.4 x 5.6 |
41 |
f/8 |
2.41 |
|
|
Canon 710IS |
8.2 |
5.8 x 4.3 |
24 |
f/8 |
1.75 |
|
|
Tablet |
7 |
5.0 x 4.0 |
20 |
f/2.4 |
5.10 |
|
|
Phone |
3.1 |
2.5 x 1.8 |
5 |
f/2.8 |
1.90 |
|
|
Calculations derived from website http://dofsimulator.net |
|
|||||
When photographing a model or a scene on a layout we usually place the camera as close as we can to the subject so that it fills the picture. If however we place the camera so that it is the hyperfocal distance away from the subject then the entire picture will be in focus apart from the foreground closest to the camera, although the subject may look small. After we have transferred the photo to a computer we can crop it so that the result is a nicely composed picture of the subject. Current cameras have high pixel counts and even cropping a small area out of the centre of a photo will still leave an image that has a more than adequate pixel count for most purposes. In the example below the original image is 5 megapixels and the cropped image is 0.65 megapixels, which is more than big enough for a 5”x3” print. Newer cameras have higher pixel counts, the iPad Air 2 has an 8 megapixel camera and many compact cameras have sensors with 12 megapixels or more.
That is the theory but as you can see from the table some of the hyperfocal distances are quite large, which will mean you can’t set the camera that distance away from the subject. You can still get a good picture though as long as you can set the camera far enough away for the depth of field to be sufficiently large. Set the camera as far away as possible and see how good the depth of field is and if it is not good enough change the angle of the picture or try a different picture.
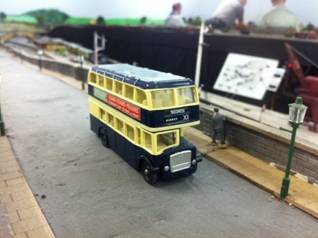
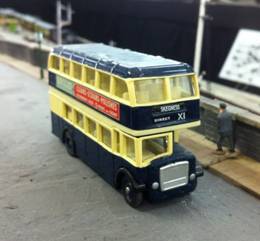
In the two
pairs of pictures below the original is the left picture and the right picture
has been cropped so that the bus is the subject of the picture. These pictures were taken with an iPhone 4 which has a lens aperture of f/2.8 and a 5 megapixel sensor.
The top picture
is taken so that the bus is close to full frame, whereas the bottom is taken so
that the camera is almost at the hyperfocal distance of 1.9 metres from the
bus, if it were at the hyperfocal distance the people in the background would
be in focus.
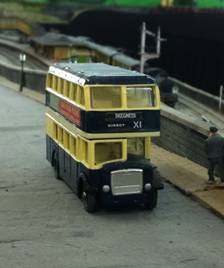
Now if we
crop both pictures so that bus is about the same size look what happens. The bus in
picture in the bottom picture is now in focus from front to back but the back
of the bus is out of focus in the top picture.

Iterative Photo Sessions
The one thing you must do when taking photos, if at all possible, and even when using a high quality camera, is to look at them on a large screen during your photo session. You will usually find that the first ones you take look awful, but you will know what isn’t working. So you can go back, make adjustments and try again until you get a picture that is good. It is not just the focus, but the lighting and the composition that need this sort of attention, none of these look the same on the little screen on the back of the camera as they do on a big screen.
Don’t think that you should be able to just point the camera at the subject, click the shutter and you will have a good picture, because it is unlikely that you will, whatever camera you are using. Even when using a Digital Single Lens Reflex camera there are problems getting everything you want in focus, getting the lighting right and getting the composition right. So don’t expect to be able to do better with a much less flexible camera. That doesn’t mean you can’t get good pictures, but it means that you have to work harder to get them due to the limitations of the camera.
If you have a notebook computer and can connect your camera to it via a USB cable then you may be able to see on the computer screen what the camera is seeing. If you can set this up it will be ideal for getting to know what works and what doesn’t before you press the shutter release.
More likely you will have to transfer the pictures either via a USB connection or by taking the memory card out of the camera and plugging it into your computer.
Whatever camera you are using you must get as much light onto the subject while avoiding harsh shadows and rest the camera on a firm surface to avoid camera shake. A tripod or a small bean bag is the best, but anything that will stop the camera moving is OK. Since the exposure will be long if indoors use the delayed shutter release if your camera has this feature since this will minimise the possibility of shake from the action of pressing the shutter release.
When you have taken two or three photos check them on the computer screen and make sure they look good. If they are not in focus then go back and change the angle or the composition until you get a picture that is presentable.
You may be able to fix the lighting and composition in Photoshop or another editing program, but you can do nothing about focus, so it must be right when you take the photo.
*****